Authentication: Difference between revisions
mNo edit summary |
|||
| (9 intermediate revisions by the same user not shown) | |||
| Line 1: | Line 1: | ||
== Authentication == | == Authentication == | ||
This process uses the AssetId and ask you a picture to assert that picture is properly taken from the alleged | This process uses the AssetId and ask you a picture to assert that picture is properly taken from the alleged ''AssetID'' | ||
The UI propose either the "Generic" mode aimed at any kind of objects and a few preset modes, like "Banknotes". We call theses preset mode a 'class' and should not be confused with the 'collection' concept in use with Blockchain | The UI Drop down does propose either the "Generic" mode, aimed at any kind of objects, and also a few preset modes, like "Banknotes". | ||
We call theses preset mode a 'class' and this convention should not be confused with the 'collection' concept in use with Blockchain. | |||
You should use the proper class during Authentication.  | You should use the proper class during Authentication.  | ||
'''Note:''' | |||
''Classes are provided to ease user interaction while of less importance during authentication they are especially useful during Registration to speed up the process.'' | |||
'''Note:''' | '''Note:''' | ||
''Some Assets use predefined template (like Banknotes) which allows to catch the AssetID automatically for you using various image recognition | ''Some Assets use predefined template (like Banknotes) which allows to catch the AssetID automatically for you using various image recognition technic imbeded in iKanChain like OCR of a Serial number.'' | ||
'''Note:''' | '''Note:''' | ||
''Some Asset may have more than one "view" like a | ''Some Asset may have more than one "view", like a banknote which have 2 faces called "views", these views will be automatically recognized, no need to care about their order.'' | ||
''For Banknote | ''For the Banknote case, and alike, you may submit a single view for it if you know precisely the AssetID, however it is strongly recommended that amongst the plurality of submitted views you submit the side with the serial number which trigger the OCR to help setting the proper AssetID'' | ||
''You can submit more than 1 view, this is useful to care about a variety of lighting condition if you have a doubt or to benchmark the process submitting other similar object (typically demo of this can be done using the back side other banknotes of same kind, they should outcome as "not Authentic"'' | ''You can submit more than 1 view, this is useful to care about a variety of lighting condition if you have a doubt or to benchmark the process submitting other similar object (typically demo of this can be done using the back side other banknotes of same kind, they should outcome as "not Authentic"'' | ||
=== | === Case of "Generic" class === | ||
Select a | Select a Classe, here we use "Generic" for a top of a can of Coke | ||
Enter the | Enter the ''AssetID'' name (or use the suggestion taken from your wallet if connected), the next will ask you to load a picture. | ||
{| class="wikitable" | {| class="wikitable" | ||
!<div style="display: inline; width: 900px; float: right;"> | !<div style="display: inline; width: 900px; float: right;"> | ||
[[File:768 Authenticate-1 Select Generic IMG 9366.jpg|300 px]] [[File:Arrow_Right_64_R.png]] [[File:768 Authenticate-2 Select or Enter a AssetId IMG 9358.jpg|300 px]] </div> | [[File:768 Authenticate-1 Select Generic IMG 9366.jpg|300 px]] [[File:Arrow_Right_64_R.png]] [[File:768 Authenticate-2 Select or Enter a AssetId IMG 9358.jpg|300 px]] </div> | ||
!in "Generic" mode the AssetId is mandatory as it is not guessed looking at the object (like it is for "BankNote" class) | !in "Generic" mode the AssetId is mandatory as it is not guessed looking at the object (like it is for "BankNote" class) | ||
Here we select "CokeZero 12345" as the drop down shows it, the drop down reflect your own wallet objects, so without wallet you don't have any suggestion and must enter the full exact AssetId | |||
|} | |} | ||
Once the AssetId is found on the Blockchain, you will see a picture of a camera aimed at giving you instruction on how to frame your photo. | Once the AssetId is found on the Blockchain, you will see a picture of a camera aimed at giving you instruction on how to frame your photo. | ||
| Line 36: | Line 45: | ||
[[File:768 Authenticate-2 Select or Enter a AssetId IMG 9358.jpg|100 px]] [[File:Arrow_Right_64_R.png|20 px]] [[File:768 Authenticate-3.0 Select Picture IMG_9371.jpg|300 px]] [[File:Arrow_Right_64_R.png]] [[File:768 -4 Register Camera Typical IMG 9341.jpg|300 px]] </div> | [[File:768 Authenticate-2 Select or Enter a AssetId IMG 9358.jpg|100 px]] [[File:Arrow_Right_64_R.png|20 px]] [[File:768 Authenticate-3.0 Select Picture IMG_9371.jpg|300 px]] [[File:Arrow_Right_64_R.png]] [[File:768 -4 Register Camera Typical IMG 9341.jpg|300 px]] </div> | ||
!Either use an existing picture or use imbedded web camera with "Take Photo". | !Either use an existing picture or use imbedded web camera with "Take Photo". | ||
|} | |||
=== Take picture === | |||
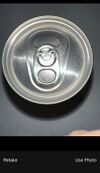
Frame your photo as close as possible to the suggested preview, don't forget to set the flash on. | |||
{| class="wikitable" | |||
!<div style="display: inline; width: 900px; float: right;"> | |||
[[File:768 -4 Register Camera Typical IMG 9341.jpg|100 px]] [[File:Arrow_Right_64_R.png|20 px]] [[File:768 -5 Register Camera Good Flash IMG 9344.jpg|300 px]] [[File:Arrow_Right_64_R.png]] [[File:768 Authenticate-3.1 Picture done IMG_9372.jpg|300 px]] </div> | |||
!Once Photo done press "Submit" (or see below mutilple object case). | |||
|} | |||
=== Authenticate === | |||
"Submit" does trigger the Authentication process. | |||
{| class="wikitable" | |||
!<div style="display: inline; width: 900px; float: right;"> | |||
[[File:768 -5 Register Camera Good Flash IMG 9344.jpg|100 px]] [[File:Arrow_Right_64_R.png|20 px]] [[File:768 Authenticate-3.1 Picture done IMG_9372.jpg|100 px]] [[File:Arrow_Right_64_R.png]] [[File:768 Authenticate-4 Result good IMG_9361.jpg|300 px]] </div> | |||
!"Authentic" in Green is the result. | |||
|} | |} | ||
=== Authenticate if failed === | |||
If not the exact object, you will be notified | |||
{| class="wikitable" | {| class="wikitable" | ||
!<div style="display: inline; width: 900px; float: right;"> | !<div style="display: inline; width: 900px; float: right;"> | ||
[[File:768 - | [[File:768 -5 Register Camera Good Flash IMG 9344.jpg|100 px]] [[File:Arrow_Right_64_R.png|20 px]] [[File:768 Authenticate-3.1 Picture done IMG_9372.jpg|100 px]] [[File:Arrow_Right_64_R.png]] [[File:768 Authenticate-4.1 result bad IMG_9362.jpg|300 px]] </div> | ||
! | !"Not Authentic" in red means this is NOT the same object (it's Optical signatures doesn't match the one from the AssetId) | ||
|} | |} | ||
=== Batch mode === | |||
To submit a batch of picture of objects,(either same with different lighting condition or different one if you need to find out which is is the right one) | |||
use the '+' sign to create additional 'view' for input (use 'x' if you need to remove it). | |||
"Submit" | Then press "Submit" and you will get result for each individual objects. | ||
{| class="wikitable" | {| class="wikitable" | ||
!<div style="display: inline; width: 900px; float: right;"> | !<div style="display: inline; width: 900px; float: right;"> | ||
[[File:768 - | [[File:768 Authenticate-3.1 Picture done IMG_9372.jpg|100 px]] [[File:Arrow_Right_64_R.png|20 px]] [[File:768 Authenticate 2.1 Take Multi objects IMG_9368.jpg|300 px]] [[File:Arrow_Right_64_R.png]] [[File:768 Authenticate-4.1 Result Multi Objects IMG_9370.jpg|300 px]] </div> | ||
!"Authentic" | !Here the status "Authentic" authentify the right 'CokeZero 12345', others are photo from other can. | ||
|} | |} | ||
Latest revision as of 22:12, 15 October 2025
Authentication
[edit | edit source]This process uses the AssetId and ask you a picture to assert that picture is properly taken from the alleged AssetID
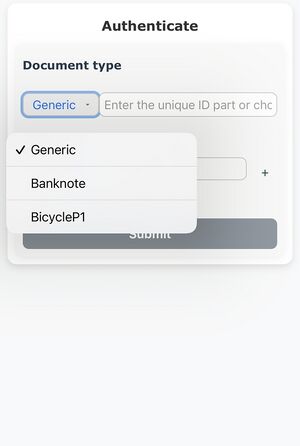
The UI Drop down does propose either the "Generic" mode, aimed at any kind of objects, and also a few preset modes, like "Banknotes".
We call theses preset mode a 'class' and this convention should not be confused with the 'collection' concept in use with Blockchain.
You should use the proper class during Authentication. 
Note:
Classes are provided to ease user interaction while of less importance during authentication they are especially useful during Registration to speed up the process.
Note:
Some Assets use predefined template (like Banknotes) which allows to catch the AssetID automatically for you using various image recognition technic imbeded in iKanChain like OCR of a Serial number.
Note:
Some Asset may have more than one "view", like a banknote which have 2 faces called "views", these views will be automatically recognized, no need to care about their order.
For the Banknote case, and alike, you may submit a single view for it if you know precisely the AssetID, however it is strongly recommended that amongst the plurality of submitted views you submit the side with the serial number which trigger the OCR to help setting the proper AssetID
You can submit more than 1 view, this is useful to care about a variety of lighting condition if you have a doubt or to benchmark the process submitting other similar object (typically demo of this can be done using the back side other banknotes of same kind, they should outcome as "not Authentic"
Case of "Generic" class
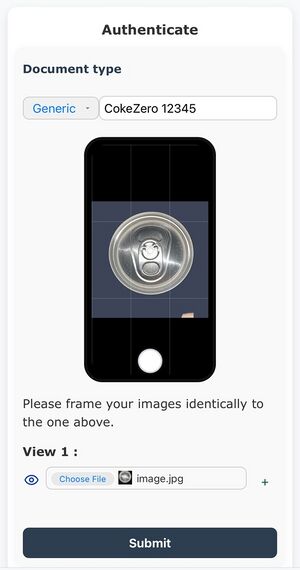
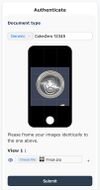
[edit | edit source]Select a Classe, here we use "Generic" for a top of a can of Coke
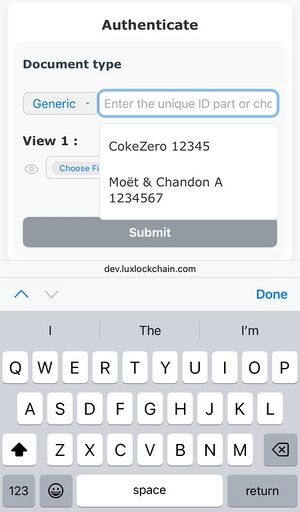
Enter the AssetID name (or use the suggestion taken from your wallet if connected), the next will ask you to load a picture.
| in "Generic" mode the AssetId is mandatory as it is not guessed looking at the object (like it is for "BankNote" class)
Here we select "CokeZero 12345" as the drop down shows it, the drop down reflect your own wallet objects, so without wallet you don't have any suggestion and must enter the full exact AssetId |
|---|
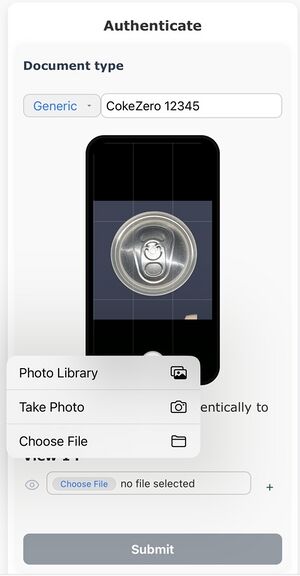
Once the AssetId is found on the Blockchain, you will see a picture of a camera aimed at giving you instruction on how to frame your photo.
| Either use an existing picture or use imbedded web camera with "Take Photo". |
|---|
Take picture
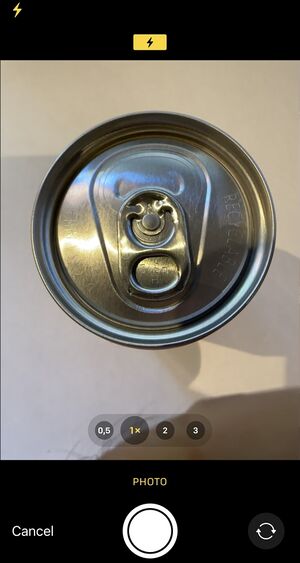
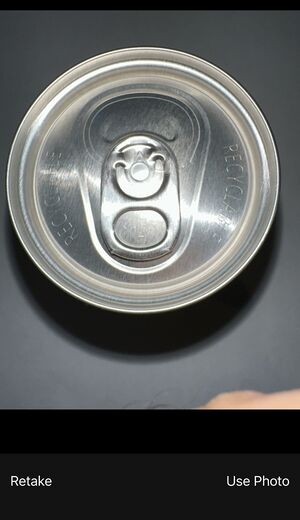
[edit | edit source]Frame your photo as close as possible to the suggested preview, don't forget to set the flash on.
| Once Photo done press "Submit" (or see below mutilple object case). |
|---|
Authenticate
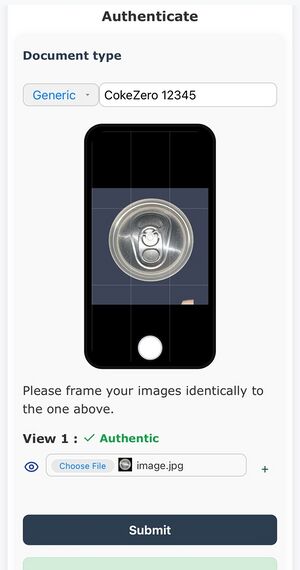
[edit | edit source]"Submit" does trigger the Authentication process.
| "Authentic" in Green is the result. |
|---|
Authenticate if failed
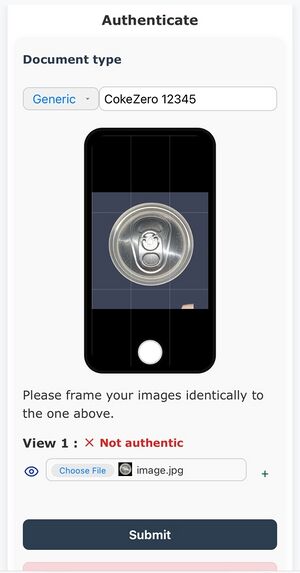
[edit | edit source]If not the exact object, you will be notified
| "Not Authentic" in red means this is NOT the same object (it's Optical signatures doesn't match the one from the AssetId) |
|---|
Batch mode
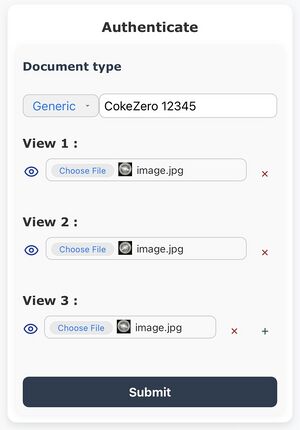
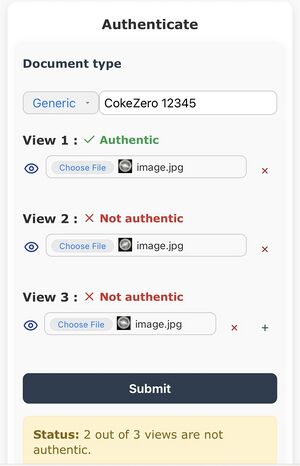
[edit | edit source]To submit a batch of picture of objects,(either same with different lighting condition or different one if you need to find out which is is the right one)
use the '+' sign to create additional 'view' for input (use 'x' if you need to remove it).
Then press "Submit" and you will get result for each individual objects.
| Here the status "Authentic" authentify the right 'CokeZero 12345', others are photo from other can. |
|---|
